How to build cheap Multi-Room Audio System
This build will use raspberry pis for network players and logitec media server that can be run on windows or linux.
Logitec Media Server LMS is a media server made for the logitec squeezebox Network music players. We will use this software for our project and will build squeezebox players using a raspberry pi, USB sound card and some multimedia speakers.
The parts we need:
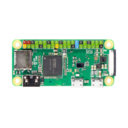
- Raspberry Pi Zero W (you can use other models but this is the perfect one)
- Any SD card that can fit raspbian light - bigger cards will last longer.
- USB sound card (I have used this cheap $1.5 sound card from gearbest.com)
- Micro USB Male to USB Female Cable Adapter - we need this as the raspberry pi zero have only one micro usb port.
- Micro USB cable and 5v power supply to power the raspberry pi.
- Multimedia Speakers with 3.5 inch audio input.
I have started my multi-room audio system with Logitech Multimedia 2.1 Speakers Z213 as they are very cheap and offer decent sound for their price - around $25. Later I have picked Logitech Z333. - USB hub and USB network card - wi-fi or wired depending on your need - (You’ll need this if you don’t use pi zero w)

These are the parts we need to build one of ours network music players.
We also need a computer for the Logitech Media Server - in my experience this server works best on windows computers. I am hosting mine on a PIPO X8 its a tablet like computer with 12v power supply, Windows 10, Intel Z3736F Quad Core CPU, 2GB ram and 64GB disk space.
For the hosting of the logitech media server you can use your desktop computer, an old laptop, a raspberry pi (model 3 or 2), Netgear NAS and maybe something else.
Go to Logitech Media Server site and download the version matching your choice of OS.
Here you can find instructions for installing LMS on different operation systems

Preparing the raspberry pi SD card:
I’ll show you how to prepare the SD card with a Windows computer. This is the SD card we’ll use for our network music players.
- Download and install Win32 Disk Imager on your PC.
- Download Raspbian Stretch Lite image from raspberrypi.org site. (you can also use the full version but there is no need to do so and it is bigger)
- Use Win32 disk imager to write the raspbian image you have just downloaded to the SD card.
- If you plan to connect this player/rpi via wifi, now is the time to configure the wi-fi network credentials (if you don’t do so now you’ll have to attach monitor and a keyboard to your rpi later).
Create a file
wpa_supplicant.confand place it in thebootpartition. wpa_supplicant.confctrl_interface=DIR=/var/run/wpa_supplicant GROUP=netdev update_config=1 network={ ssid="YourNetworkSSID-1" psk="passwordOne" } - To enable ssh create an empty file named
sshand place it in the boot partition. - Insert the SD card in the raspberry pi, connect the USB sound card using the cable adapter, connect the 5v power supply, after less than 1 minute it should boot and connect to the network.
- Now you need to find the IP address of the raspberry pi, you can do that by checking the DHCP clients in you router control panel or use your phone and an application like Fing (there is also an iphone version of Fing)
- Once you find the ip address ssh to it using Putty or your favorite ssh client.
When connecting use userpiand passwordraspberry
After you log in for a first time change the default password with$ passwd
- Update your system packages by running
$ sudo apt-get -y update && sudo apt-get -y dist-upgrade
This will take some time.
- Install some libraries that are needed by squeezelite
$ sudo apt-get install -y libflac-dev libfaad2 libmad0
- Create a folder for squeezelite and download it:
$ mkdir squeezelite
$ cd squeezelite
$ wget -O squeezelite-armv6hf.tar.gz http://www.gerrelt.nl/RaspberryPi/squeezelite_ralph/squeezelite-armv6hf.tar.gz
$ tar -xvzf squeezelite-armv6hf.tar.gz
Here you can find Squeezelite and other LMS Clients for different OS.
- Now set the sound level:
$ sudo alsamixer
Use the
F6key to select the right sound card (I am using an USB sound card), and then set the volume using the arrow keys. Set the volume just before the red zone also set the microphone volume to zero, to make sure it will not cause any noise. then type:$sudo alsactl store
to save the soundcard output levels so they don’t revert after restarting the system.
- Before we can run squeezelite we need to find the name of our usb sound card.
$ ./squeezelite -l
You’ll get an output like the one below:
Output devices:
  null                           - Discard all samples (playback) or generate zero samples (capture)
  pulse                          - PulseAudio Sound Server
  default:CARD=ALSA              - bcm2835 ALSA, bcm2835 ALSA - Default Audio Device
  sysdefault:CARD=ALSA           - bcm2835 ALSA, bcm2835 ALSA - Default Audio Device
  dmix:CARD=ALSA,DEV=0           - bcm2835 ALSA, bcm2835 ALSA - Direct sample mixing device
  dmix:CARD=ALSA,DEV=1           - bcm2835 ALSA, bcm2835 IEC958/HDMI - Direct sample mixing device
  dsnoop:CARD=ALSA,DEV=0         - bcm2835 ALSA, bcm2835 ALSA - Direct sample snooping device
  dsnoop:CARD=ALSA,DEV=1         - bcm2835 ALSA, bcm2835 IEC958/HDMI - Direct sample snooping device
  hw:CARD=ALSA,DEV=0             - bcm2835 ALSA, bcm2835 ALSA - Direct hardware device without any conversions
  hw:CARD=ALSA,DEV=1             - bcm2835 ALSA, bcm2835 IEC958/HDMI - Direct hardware device without any conversions
  plughw:CARD=ALSA,DEV=0         - bcm2835 ALSA, bcm2835 ALSA - Hardware device with all software conversions
  plughw:CARD=ALSA,DEV=1         - bcm2835 ALSA, bcm2835 IEC958/HDMI - Hardware device with all software conversions
  default:CARD=Device            - USB Audio Device, USB Audio - Default Audio Device
  sysdefault:CARD=Device         - USB Audio Device, USB Audio - Default Audio Device
  front:CARD=Device,DEV=0        - USB Audio Device, USB Audio - Front speakers
  surround21:CARD=Device,DEV=0   - USB Audio Device, USB Audio - 2.1 Surround output to Front and Subwoofer speakers
  surround40:CARD=Device,DEV=0   - USB Audio Device, USB Audio - 4.0 Surround output to Front and Rear speakers
  surround41:CARD=Device,DEV=0   - USB Audio Device, USB Audio - 4.1 Surround output to Front, Rear and Subwoofer speakers
  surround50:CARD=Device,DEV=0   - USB Audio Device, USB Audio - 5.0 Surround output to Front, Center and Rear speakers
  surround51:CARD=Device,DEV=0   - USB Audio Device, USB Audio - 5.1 Surround output to Front, Center, Rear and Subwoofer speakers
  surround71:CARD=Device,DEV=0   - USB Audio Device, USB Audio - 7.1 Surround output to Front, Center, Side, Rear and Woofer speakers
  iec958:CARD=Device,DEV=0       - USB Audio Device, USB Audio - IEC958 (S/PDIF) Digital Audio Output
  dmix:CARD=Device,DEV=0         - USB Audio Device, USB Audio - Direct sample mixing device
  dsnoop:CARD=Device,DEV=0       - USB Audio Device, USB Audio - Direct sample snooping device
  hw:CARD=Device,DEV=0           - USB Audio Device, USB Audio - Direct hardware device without any conversions
  plughw:CARD=Device,DEV=0       - USB Audio Device, USB Audio - Hardware device with all software conversions
Since we are using a USB Audio Device we need to pick one of the listed USB devices. I am using
front:CARD=Device,DEV=0as it works best for me. You can test the other USB devices and decide for yourself.$ ./squeezelite -n Player-location -m 15:c4:20:16:b7:4f -o front:CARD=Device,DEV=0
-nsets the name of the player - the name that you’ll see when you control it.
-mis the mac address of the network player - pick a random mac address - it should be unique for each player in your network.
-ois the output device used for the playback (your USB sound card)
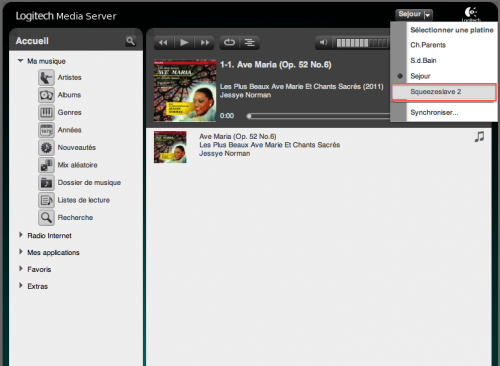
If you don’t see any error go to logitech media server and check if you see your new player (the players are listed in the top right section of LMS web control panel). You can test the player to make sure its working properly. When done testing you can close the server withCtrl+C - Starting Squeezelite on Startup.
There are many ways you can use to start the player on start up. The easiest one I have found is usingcrontab.$ crontab -e
and add this line somewhere in the file
@reboot sudo -u pi /home/pi/squeezelite/squeezelite -n Player_Name -m 15:c4:20:16:b7:4f -o front:CARD=Device,DEV=0 &
- Reboot your raspberry pi to make sure the player is loaded on startup. This is all you need to do to create a new network music player for your multi-room audio system. For the other players you need to repeat all the steps described above and pick a different mac (-m) address and name (-n) in the player configuration step.
Stability of the system
The players can work fine on wi-fi if you have decent wi-fi coverage.
It is recommended that you run your LM server on a wired connection thus it can also work on wi-fi.
The stability of the players mainly depends on the choice of the USB sound card. I have tested maybe 5 different cheap (up to $3) sound cards and only the one listed in the parts section works without causing problems. The others will make the player hung in silence or repeating a very annoying sound. If you use raspberry pi zero, when playing music the CPU load should be around 0.15. If you want better sound and you can afford to pay more you can build your players with HiFiBerry Amplifier or some other rapsberry pi compatible Amplifier.
Using a bad SD card can also affect the system stability.
I am using such multi-room audio system with 2 raspberry pi network players that run 24/7 - one on wi-fi the other on LAN and there are months with no outages. There is also a third player on my windows desktop PC - this one causes no issues but it is rebooted daily.
If some player (mainly the wi-fi one) disappears from the network or I don’t see it in LMS I just restart it from the plug and it comes back in a minute.
You can start a network player on the computer running the logitech media server using a build in plug-in.
What media is supported by my multi-room audio system?
Logitech Media Server supports many audio sources that you can enjoy now:
- Your own MP3 collection, it can be located on any samba share in your network or the computer running the server.
- Spotify - you need a paid account.
- Many free on-line sources like SomaFM, SoundCloud, TuneIn Radio (tons of on-line radio stations), YouTube and others - these depends on your location. You can see them all here.
- Custom streams from URLs you add.
You can use your new multi-room audio system to play synchronized music in all of your rooms or if you prefer you can play different music in each room. You can also have a group of synchronized players and stand alone players playing different music.
How can we Control the system?
The easiest way is to use the web interface located at http://lms_server_ip:9000 (you can change that port to 80 from LMS configuration)

You can also use a phone application to play your music. The best I found for android phones is squeezer. It automatically discovers my LSM when on the same network and allows me to control most of the functions of the server.